Chef Dropout’s Mouthwatery French Toast

May 17, 2019

Chef Dropout’s Breakfast 

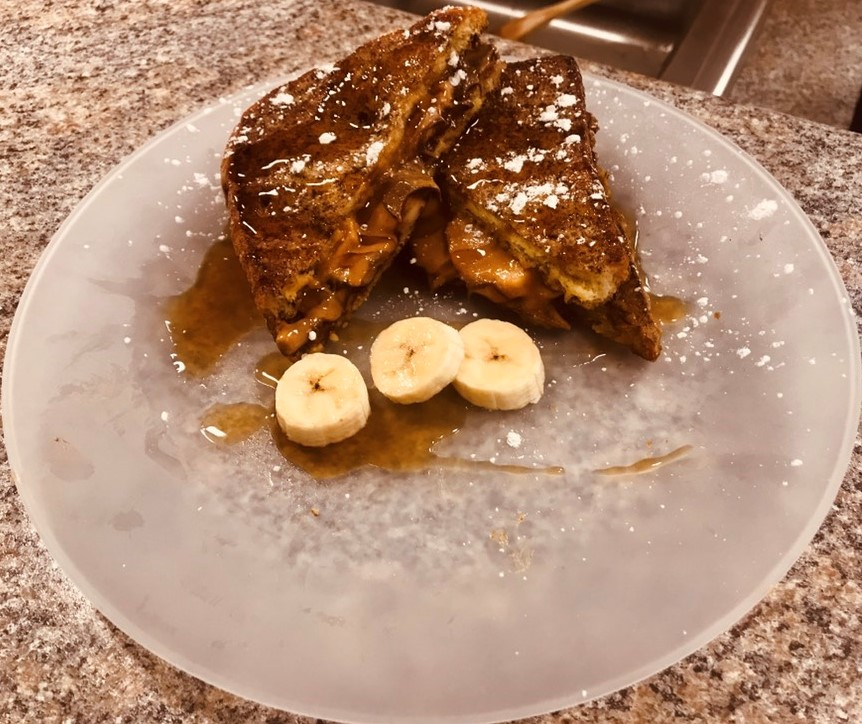
This mouthwatering french toast is easy to make and very fulfilling. Can take it on the go, which is convenient for college students.

Ingredients: 

  • 10 St. Pierre Brioche Loaf bread  
  • 2 Chiquita bananas 
  • Kroger Original Pancake Syrup 
  • 1/2 tbsp Kroger Hazel Nut Spread (Nutella) 
  • 1/2 tbsp Kroger Natural Creamy peanut butter 
  • Powdered sugar 
  • 1/2 tsp Smidge and Spoon vanilla 
  • 1/2 tsp Cinnamon
  • Blue Bonnet butter 
  • 6 Eggs

Directions: 

  1. Crack 6 eggs into a bowl 
  2. Add a ½ teaspoon of vanilla and cinnamon into the same bowl 
  3. Spread 2 knife loads of butter on to the pan. Make sure the stove is at medium heat and let the butter melt.  
  4. Once the butter is melted dip each side loaf of bread into the egg mix and place it on the pan. Depending on how big the skillet is 2 loaves of bread can be placed on the pan at the same time. 
  5. Flip each side to toast it evenly. Each side should only take 2-3.
  6. Once the french toast is done; grab two pieces of toast and spread the 1/2 tbsp of Nutella on one side of the bread and  1/2 tbsp of peanut butter on the opposite side.
  7. Slice the banana and put them on the entire side that has Nutella. 4-5 pieces of sliced banana should be enough.
  8. Make it into a sandwich and then cut it in half diagonally  
  9. Drizzle powdered sugar on each slice of the sandwich to your liking 
  10. Drizzle syrup on each slice of the sandwich to your liking 
  11. Optional- have more slices of banana on the side. 


Ratings

  • Taste: 9-  It was amazing but maybe cut down on the Nutella and peanut butter amounts.
  • Mouthfeel/consistency:  10
  • Smell: 10/10- smelled amazing and smell filled the whole kitchen
  • Visual appeal: 10/10 – the powdered sugar really made it more appealing.
  • Creativity: 9/10- Could have added more fruits for visual appeal and texture.
Comments Off on Chef Dropout’s Mouthwatery French Toast

Theory of Mind: Chicken-Sausage Italian Gumbo

May 17, 2019

For lunch we made an Italian inspired chicken and mild sausage gumbo served with brown rice. This can definitely be made on a budget with plenty of leftovers! Below we have all the directions and ingredients so you can make it as well! We would love to see your creations of this dish!

Ingredients:

  • 1/2 orange bell pepper
  • 1/2 sweet onion
  • 1 stalk celery
  • 2 cloves garlic
  • 2 mild Italian sausage
  • 1 chicken breast
  • Half stick of butter
  • 5Tbsp flour
  • 1 cube of Bouillon
  • 1 can of tomato paste
  • 1 tsp of distilled white vinegar
  • ½ a cup of brown rice

Directions:

  • Cook rice based on the instructions on box or bag
  • Chop orange bell pepper, sweet onion, and celery into small pieces (about half an inch wide).
  • Cut the sausage and chicken into small chunks (about an inch)
  • Roux: half a stick of butter and 5tbsp
  • To make bouillon: 1 cup and a half of water with 1 cube of bouillon
  • Add bouillon into roux
  • Once the chicken and sausage are cooked place the onions, garlic, bell pepper, and celery into the skillet with ½ tbsp into the pan.
  • Add seasoning to skillet: 1 Tbsp basil, 4 pinches of oregano, 2 pinches garlic powder, 1 pinch of onion, thyme and rosemary. (adjust spices to flavor preferences)
  • Add a tsp of distilled white vinegar to skillet and let it simmer for about 5-8min.
  • Serve with 1/2 cup of rice with a ladle of gumbo

Presentation:

Taste: 7.5, missing citrus, salty, and spicy

Mouth: 9, good because not a lot of soft textures and crunch

Smell: 9.5, smelling of the herbs was nice

Visual appeal: 10, lots of color

Creativity: 10, we made a roux


Comments Off on Theory of Mind: Chicken-Sausage Italian Gumbo

Chef Dropout’s Fajita Recipe

May 17, 2019

Objective:

We choice this meal because it was an easy dish to cook, colorful, and fun for our taste buds. The ingredients were cheap and health for college students. Preparing the meal only takes about 30 min. We choose chicken for our protein because it’s lean meat and easy to cook. This will supply lunch for six while having leftovers.

Ingredients:

  • 2 lbs boneless breast chicken*
  • Expensive than we realized
  • Mango unit price = $3.49
  • Lime unit price = $0.34
  • Red pepper unit price = $0.99
  • Green pepper unit price = $0.99
  • Onion’s unit price = $0.99
  • Corn tortilla = $1.89, cents/oz = $0.687
  • Yellow rice unit price = $1.69, unit price = $0.169
  • Salt**
  • Thyme
  • Basil
  • black peppers
  • Garlic powder
  • 2 tablespoons of olive oil
  • =$17.70 (with tax included)

*$3.99 chicken was more

**From salt to garlic powder was not purchased

Directions (Annotations on the 2ndpage):

  1. Dice the chicken*
  2. Chop the onions, the red and green peppers
  3. Slice the mango**
  4. Put the onions, red and green peppers in a bowl
  5. Grab a saucepan and pour 2 tablespoons of olive oil. Let that heat up.
  6. Place the diced chicken in saucepan***
  7. Pour water in the pot and wait until it boils
  8. Pour rice in the pot****
  9. Stir the chicken around the saucepan
  10. Stir fry the vegetables with a teaspoon of olive oil in the saucepan
  11. Squeeze half of the lime in the saucepan and leave it in.
  12. Put the tortilla on the skillet for one minute on each side*****
  13. After the stir fry was done for the vegetables, mix with the mango

*Steps 1-3 can be done in any order

**Mango can be diced as well

***15-20 minutes for the chicken to be cooked

****20-25 minutes for the rice to be cooked

*****Each side should be a little brown or tortilla can be placed in the microwave for 5-10 seconds

Ratings

  • Taste: 9/10

Add a little bit of salt

  • Mouthfeel/consistency:  9/10

It had a crunchy taste with vegetables and fruit

  • Smell: 10/10
  • Visual appeal: 10/10 
  • Creativity: 8/10

Mango was a special fruit


Comments Off on Chef Dropout’s Fajita Recipe

Cheddar & Spinach Sausage and Gravy- Macaroons

May 17, 2019

Cheddar-Spinach Sausage and Gravy

This breakfast dish has a flavorful and healthy twist on a modern classic American meal. Don’t be fouled by it’s peculiar appearance, this dish is surprisingly delicious with a mouth full of “Aww” and comfort.  Take the risk. Take the Bite. Be Astonished.

Ingredients:

-1 lb- sausage w/ sage (or without)

-10 oz bag fresh spinach

-3 cups of milk (whole milk)

-1/4 cup of all purpose flour

-1/2 cup of sharp cheddar (shredded)

– 1 tsp. Black pepper

-2 16 oz cans of Gumbo biscuits


Pre-Prep:

1.Pre-heat oven to 350

2.Bake biscuits for 15 minutes on an un-greased sheet

3. Chop spinach finely and keep in a separate pot


Directions:

1. Cook sausage in a skillet & chop up finely. Sausage will be easier to chop once it begins to brown. Cook at medium heat (7) then move to low heat (3) when sausage begins to darken and sizzle. Leave the grease in the pan, don’t drain. (this will be used in the gravy). The sausage will take about 8-10 minutes to cook.

3. Cook the chopped spinach down in another pan. Start cooking at medium heat and once the spinach darkens and releases water turn the heat down to low (3) Once the spinach is dark and has liquids add 1 tsp. of pepper. Add more pepper to taste if preferred.

4. When the sausage is down cooking add the spinach in with the sausage.

5. Sprinkle flour over the sausage and mix well until it is all absorbed. Turn the heat back up to medium heat (7).

6. Add milk and stir. Bring the milk to a boil and then turn the heat down to low (4-3) and let it simmer until thick. The longer it simmers and cooks the thicker the gravy will become. Add more flour (1 tsp-1 tbsp) if the gravy isn’t thickening.

7. Add cheese and mix til melted and mixed in well. Taste the gravy and if you want a more “cheddar” flavor add more cheese.

8. Add salt and pepper  to taste as needed (sprinkle/pinches)

9. Serve gravy on top of biscuits. Sprinkle cheese on top of gravy if wanted.


Ratings:

-Taste: 8 Taste good. Very flavorful. A lot of Umami.

-Mouth Feel: 7 Consistent texture. Thick & creamy.

-Smell: 6 Didn’t smell awful. Didn’t smell like sausage and gravy, smelt more like broccoli (but didn’t taste like broccoli)

-Visual Appeal: 4 Appeared more green and yellow than sausage and gravy. This is due to the cheese and spinach. We suggest to not add the spinach til the sausage and gravy is complete.

-Creativity: 6.5 Sausage and gravy can’t really be creative, but we added a twist with a spinach-cheddar flavor.

Comments Off on Cheddar & Spinach Sausage and Gravy- Macaroons

Chop It Like It’s Hot: Pesto Pasta Dish

May 16, 2019

Pesto Pasta 

Pesto pasta makes a great lunch or dinner meal. The rich taste is one the whole family will love. With this recipe, there will for sure be leftovers, but not worries, the oil based sauce helps keep the pasta moist making for a great snack to warm up later. It is a balanced meal with a great source of protein and vegetables. While this recipe calls for three vegetables there are a variety of veggies that could be added to this dish. Substitutions can be made to meet all your family’s dietary needs.

Ingredients:

  • 1.5 lb Chicken Breast
  • 10oz Grape Tomatoes
  • 5 oz Spinach
  • 8 oz Mushrooms
  • 16 oz Pasta
  • 6 oz Pesto
  • 1/2 tsp Garlic Powder
  • 1/2 tsp Onion Powder
  • 1/2 tsp Basil
  • 1/2 tsp Salt
  • 1/2 tsp Pepper
  • 2 tbsp Vegetable Oil
  • Optional: Parmesan Cheese

Materials:

  • Skillet
  • Medium pot
  • Knives
  • Spoons
  • Spatula
  • Large mixing Spoon
  • Strainer
  • Mixing bowls
  • Heat safe bowl
  • Cutting board

Step by Step:

  • Preparing the Chicken-
    • Dice the chicken breast horizontally and vertically to make a bit size piece of meet.
    • Heat the skillet on medium heat
    • Add around 2 tbsp of vegetable oil into the skillet
    • Place the chicken into the pan and begin stirring
    • Add roughly a pinch to 1/2 tsp of garlic powder, basil, salt, and pepper
    • Cook chicken until the middle is completely white
    • Remove chicken from the skillet
    • Place in a heat safe bowl
    • Leave the left over juice in the pan to help flavor the vegetables
  • Preparing the Vegetables
    • Mushrooms
      • Be sure to wash the mushrooms
      • If mushrooms are not already diced, cut them vertically into roughly fourths
      • Place into the skillet and begin cooking
    • Grape Tomatoes
      • Wash the tomatoes
      • Dice the tomatoes in half
      • Place into skillet and begin cooking
    • Spinach
      • Requires no preparation
    • Allow the mushrooms and tomatoes to cook until they are almost done
    • Begin adding the spinach slowly (about half a bag or as much as needed)
    • Finally, once all vegetables have finished cooking, add 1 tsp onion powder and mix well
  • Preparing the Pasta
    • In a medium size pot, fill  half way full with water
    • Place the water on the stove
    • Allow it to cook on high until the water begins to boil
    • Place the whole box of pasta into the bowling water
    • Cook for roughly 12 minutes or until the noodles are to the texture of your liking.
  • Preparing the Final Dish
    • Place the chicken and vegetables back into the skillet together
    • Allow the two to heat back up and cook for a few minutes together (around 4 minutes)
    • Place the pasta into a large mixing bowl
    • Add the vegetables and chicken into the mixing bowl with the pasta
    • Stir the mixture together
    • Add one can of pesto (or as much as needed)
    • Mix together
    • Place a serving size into a bowl and top with parmesan cheese

Reviews:   ratings 1-10 (10 being outstanding)

  • Taste-  10   The pesto past has a rich taste. The sauce is not too empowering and keeps the meal     feeling light in comparison to other pasta dishes with a heavier sauce.
  • Mouth Feel/ Consistency- 10   The consistency is similar to most other pasta dishes. As long as the individual enjoys all vegetables in the dish, there should be no issue with the feeling of the pasta in the mouth.
  • Smell- 10  This dish has a rich aroma. There are a bunch of different flavors in the pasta, so it is sure to make your kitchen smell super appetizing.
  • Visual Appeal- 7  Pesto pasta has potential to be a pretty dish. If the pasta is placed in the dish first followed by the sauce, vegetables, and parmesan cheese, the dish has a cleaner look. In the picture above, the pasta was already mixed together. While it taste AMAZING, the green look of the pasta may not have as pretty of an appearance.
  • Creativity- 8


Comments Off on Chop It Like It’s Hot: Pesto Pasta Dish

Team Alpha’s Quick Chicken Chili

May 16, 2019

When people think of “chili,” they likely think of the original blend of ground beef mixed with a variety of beans in a tomato-y base. Instead of sticking with tradition, we created our own recipe that’s perfect for a quick and easy lunch that doesn’t break the bank! To make our dish a little lighter than other chilis, we used chopped chicken and great northern beans mixed into a chicken broth base. By putting our own twist on a classic favorite, we were able to create a dish that’s equally as filling with a jam-packed flavor profile that added a little extra heat for all of the spice-lovers out there!


Quick Chicken Chili (serves 5-6)

Ingredients:

  • 1 ¼ pounds of chicken breasts, cut into one-inch cubes
  • 4 tablespoons olive oil
  • 15 ounces of chicken broth
  • 2 teaspoons of black pepper
  • 1- 14.5 oz can diced chili-ready tomatoes
  • 2- 15.5 oz cans of great northern beans
  • 1 tablespoon of cayenne pepper
  • 1 tablespoon of paprika
  • 1 tablespoon of cumin
  • 2 tablespoons of flour (add more to achieve desired thickness)
  • 8 ounces shredded Monterey Jack cheese
  • 1 medium onion, diced
  • 2 teaspoons of garlic powder

Directions:

  1. Heat 2 tablespoons of olive oil in a medium-size skillet on medium-high heat. Add the diced chicken to the pan and cook for 5-8 minutes or until fully cooked. Stir in the cayenne pepper, black pepper, paprika, garlic powder, and cumin. Let cook an additional 2 minutes to allow the chicken to absorb the flavor from the spices. Set aside.
  2. In a large stew pot, heat the remaining 2 tablespoons of olive oil at medium-high temperature. Add in diced onions cook until soft. Add the chicken broth, diced tomatoes, and northern beans. Simmer uncovered for 5-6 minutes. To reach desired thickness, add one tablespoon of flour at a time, stirring constantly until dissolved.
  3. Add the chicken to the broth mixture. Cook on medium-low heat for 3 minutes, stirring frequently. Serve hot.

**Optional but highly recommended: Top chili with shredded cheese!**

Ratings:

  • Taste: 8
    • The overall taste of the chili was great—the spice mixture provided a lot of great flavors and the tomatoes, onions, and chicken broth neutralized the heat from the spices while still allowing for a little kick!
  • Consistency: 7
    • Be cautious with how much flour you put in at a time—a little bit goes a long way. Give the first tablespoon time to dissolve and then add more to avoid over-thickening.
  • Smell: 10
    • The chili smelled really great when the spiced chicken and the broth were combined. It smelled spicy, but the other ingredients help to neutralize the scent of the spices.
  • Visual Appeal: 9
    • We chose very simple presentation because the dish spoke for itself! However, the chili could have been topped with some green onion or another vegetable to add a pop of color.
  •  Creativity: 6
    • While chili in general is a pretty typical lunch dish, we definitely added a few of our own twists to this classic meal to make it our own.
Comments Off on Team Alpha’s Quick Chicken Chili

The Crafty Cuisine Quartet: “The May Salad”

May 16, 2019

A salad that is not only flavorful but pretty to look at is just what everyone needs this summer! Our dish “The May Salad” has everything a person needs for a quick but healthy lunch. From the arugula and honey lemon dressing to the avocado and nuts, you won’t be lacking in the variety or flavor profile. This salad is sweet, savory, and gives a mouthwatering sour kick that makes your tongue burst (in a good way!). Although we did incorporate chicken for some extra protein, this salad can easily be made a vegetarian dish with alternatives and still taste just as palatable.


The May Salad (serves 5-6)

Ingredients:

Salad portion:

  • 1 Whole Rotisserie Chicken- cleaned, with skin removed, and finely diced
  • 5 Cups of organic baby arugula- tossed and fluffed to create a full appearance
  • 2 cups of strawberries- washed and thinly sliced
  • 1 Whole avocado- pitted and diced into small bite size pieces
  • 1/2 cup of walnuts- thinly chopped and scattered among the top of our salad
  • 1/2 Feta cheese- scattered and slightly broken down into small crumbles

Dressing:

  • 1 Whole lemon- squeezed to utilize the juice only, no pulp or peel used
  • 1/2 olive oil
  • 2/3 cup of honey
  • 1 tsp. ground dill
  • 1/4 tsp. kosher salt
  • 1/4 tsp. black pepper

Directions:

  1. Start with the baby arugula for the base of the salad. Take the arugula and loosely separate it to arrange it in the bowl and get it out of its compact packaging.
  2. After rinsing the strawberries, thinly slice the succulent fruit and scatter them carefully among the arugula.
  3. Following the strawberries, now it’s time to pull any part of the meat from the rotisserie chicken, chop it,  and toss them in the arugula. (All skin from the chicken should be gently removed before dicing.)
  4. Next, take the avocado and separate it to remove the seed. Once the seed is removed, take a pairing knife and make slits into each avocado halves and spoon out the chopped pieces.
  5. After the avocado is chopped and arranged into the salad with the strawberries and chicken, take the walnuts and give them a rough chop until they are bite sized pieces. Next you’ll want to arrange them into the bowl, lightly drizzling them over the colorful salad mixture.
  6. For the dressing, take the lemon and cut it into halves. Juice each half into a bowl, avoid using the pulp, peel, or seeds. From there, add the olive oil and honey and whisk together until finely mixed together.
  7. Once the liquid portion of the dressing is mixed thoroughly, add the ground dill, salt, and pepper and mix together.
  8. Take the prepared dressing and pour about 1/4 a cup over the salad just enough to dress it not drench it. Store any extra dressing in the refrigerator for later use.
  9. Toss the salad and dressing in a bowl and once the two are paired perfectly, top the salad and sprinkle with feta cheese.
  10. Salad is best served immediately. Store any extra salad in the refrigerator.

Ratings:

  • Taste: 10- We felt the overall pairing of ingredients that we chose for this salad went perfectly together.
  • Mouthfeel/Consistency: 9- The taste was there, the only thing that made it difficult was trying to make sure you got every single ingredient into one bite. Overall though it had the right consistency between a crunchy texture and with the smooth texture from the feta and avocado.
  • Smell: 10- The smell from the dressing and the emphasis from the lemon and honey reflecting onto the fruit and chicken gave a very appealing aroma.
  • Visual Appeal: 10- The salad was almost to0 pretty to eat. The red from the strawberries paired with the bright greens and accents of white feta made the salad very attractive.
  • Creativity: 10- A salad is a typical pairing with really any dish but our salad had enough to make it not only a meal but the thought process that went behind each item and making sure they complimented each other but also gave a different take on something other than just a plain salad was apparent. It also played in on the creativity factor due to the versatility the salad brings for carnivores or vegetarians.
Comments Off on The Crafty Cuisine Quartet: “The May Salad”

Chicken, Spinach, & Artichoke Ring- The Macaroons

May 16, 2019

Chicken, Spinach, & Artichoke Ring


This is a flavorful, creamy, and savory dish. All seasoned and chop chicken. Chopped, cooked, and seasoned spinach. Creamy cream cheese and Parmesan cheese all mixed with extra spices. Cooked to a golden brown touch that is both delicious and nutritious.

Ingredients:

1-1.5 lb chicken

12 oz frozen leaf spinach

4 oz full cream cheese

2- 8 oz crescent rolls

1.5 cups of shredded Parmesan cheese

14 oz can artichoke hearts (in water, non-marinated)

Seasonings:

  • Salt
  • Pepper
  • Oregano
  • Garlic Powder
  • Basil
  • Parsley

Directions:

1. Cut and clean chicken if needed. Put chicken in a bowl and add seasonings to taste (pinch or as much as wanted).

2. Cook chicken in a skillet on medium high heat.

3. Thaw & finely chop spinach.

4. Drain and finely chop artichoke hearts.

5. Combine spinach & artichokes into a skillet w/ light layer of olive oil on medium high heat.

6. Add pepper as needed to spinach and artichoke mix

7. Add chicken to the mix. Cook until water/juices absorb/evaporate and the dish cooks down.

8. Use 2 cans of crescents and spread out in a circle w/ triangles (see picture) on a cooking sheet. Spread olive oil on sheet.

9. Put mixture in a bowl and add 1.5 cups of Parmesan & 4 oz of cream cheese. Mix well until thick and creamy

10. Spoon out mixture onto the perimeter of the circle crescent

11. Fold Crescent ends over

11. Cook at 350° for 20-25 minutes (until tops are golden brown)


Ratings:

  • Taste: 10 DELICIOUS. Savory, tons of umami, not too salty.
  • Mouth feel: 8 Creamy on the inside & crispy on the outside
  • Smell: 8 Umami & buttery smell
  • Visual Appeal: Golden brown crescent rolls are beautiful and provide nice contrast to the thick and creamy inside
  • Creativity: 10 All from scratch, unique, tasty & healthy


Comments Off on Chicken, Spinach, & Artichoke Ring- The Macaroons

Team Osterhholz: Pork Belly & Spiced Apples

May 8, 2019

If you haven’t had pork belly before, or what I affectionately call “roided-up bacon,” it’s rich, salty, and melt-in-your mouth good. When properly rendered and suitably sided, it is hands down the best thing I have ever eaten. Best of all, it’s really simple to prepare.

Below, I’ve given one example of how to make it, but all of these elements are flexible. For instance, we’ve done pork belly and peaches (probably my personal favorite of all time), and pork belly and Asian-style slaw to great acclaim. Additionally, I’ve suggested a particular blend of spices for the apples, but honestly, I change it each time we make it – it’s hard to go wrong with some combination of allspice, cinnamon, cloves, nutmeg, cardamom, etc.

Pork Belly & Spiced Apples (serves 3 – 4)

Watch the recipe video:


Ingredients

For the pork

  • 1 – 2 lb pork belly
  • Coarse sea salt and pepper (to taste)

For the apples

  • 2 apples (tart varieties like granny smith work well, but any will do)
  • 3 tbsp butter, separated
  • 1/4 tsp allspice
  • 1/8 tsp nutmeg
  • 1/8 tsp clove
  • Coarse sea salt (to taste)

Directions

  • Preheat oven to 450 degrees Fahrenheit. Pat pork belly dry with a paper towel, and stretch out on a cutting board, fat layer facing up. Carefully score the fat layer diagonally (both ways, forming a crosshatch pattern), being careful not to cut too deeply (i.e., just score the fat, don’t score the meat beneath).
  • Drizzle the bottom of a glass baking dish with olive oil, and place the pork belly in the dish. Season on both sides with coarse sea salt and freshly ground black pepper. Arrange the pork belly fat layer facing up, and bake on a middle rack for about 20 – 30 minutes, until the fat on top is very crispy and golden brown.
  • Reduce oven to 275 degrees Fahrenheit, and cook for another 20 – 30 minutes (may take longer, depending on size of the belly). Meat should be tender but not mushy, and fat should be well-rendered.
  • When the pork is nearly done cooking, quarter and core the apples, and cut into 1/4″ slices.
  • Remove pork belly from the oven, and set aside to rest uncovered, about 10 – 15 minutes.
  • Heat a large skillet over medium-high heat, and add 2 tablespoon of the butter. When foaming has subsided, add the apples and saute, stirring and flipping frequently, until apples have browned (about 8 – 10 minutes) and are tender, but not mushy. When apples are nearly done, add remaining tablespoon of butter and spices, and saute until evenly coated. Season lightly  with salt (not too much – the pork belly will be well-salted). Remove from heat and set aside.
  • Slice pork belly into 1/2″ slices.
  • Plate pork belly and apples, and serve immediately.

Ratings

  • Taste: 9
    • Amazing, but I reserve the “10” rating for pork belly and peaches.
  • Mouthfeel/consistency: 10
    • Tender, melt-in-your mouth meat; apples provide a nice textural contrast.
  • Smell: 10
    • The spiced apples smell like a cozy winter evening by a fire.
  • Visual appeal: 10
    • Nothing is sexier than a crisp, golden brown pork belly.
  • Creativity: 4
    • I’d call this more of a “classic” pairing than a creative one.
Comments Off on Team Osterhholz: Pork Belly & Spiced Apples